
Converting FFV1/MKV to v210/MOV

Digital Deliverables at BAVC Media
At BAVC Media Preservation one of our main objectives is to digitize tape-based media formats to preservation-ready digital files. We often try to walk the thin line between helping collection holders make decisions about their master formats and being as flexible as possible to provide them with their desired formats.
Literature about the benefits, adoption, and capture of MKV have already been written, so we’ll skip that for now. Instead, this blog post will describe our process of converting FFV1/MKV files to v210/MOV files while ensuring that no data is lost or mangled in the resulting files.
For the most part, our typical delivery package looks like this:
-
Master Files: Uncompressed 10-Bit 4:2:2 MOV
-
Mezzanine File: ProRes 422 HQ MOV
-
Access File: H.264/AAC MP4
-
Quality Control Report: QCTools gzip XML
Collection holders can choose different formats for their Master files, or can decide not to receive the Mezzanine or Access files. However, in the case that the collection holder is ambivalent about their deliverables and asks us to make the decision for them, this is the default configuration. Since many collections we work with come either from organizations or individual artists, the question of moving to FFV1/MKV can be somewhat difficult to tackle. The digital preservation advantages of FFV1/MKV are very powerful, but the amount of space saved for smaller projects (many of the collections we process contain less than 30 hours of video content) may not outweigh the technical hurdles involved in using and supporting FFV1/MKV.
That being said, we do feel that the FFV1/MKV format is extremely powerful, and try to offer it as a deliverable when discussing formats with collection holders that have the resources and training necessary to fully support it.
How can we ensure that this conversion is lossless?
All of our excitement about FFV1/MKV led us to a moment when we were just so excited about being able to support MKV in our own workflows that we created files for a collection holder that actually wanted MOV files. At this point, we had a serious question to contend with: How do we go from FFV1/MKV to MOV while ensuring that no data is lost or damaged in the process? If FFV1’s lossless compression is what it claims to be, then we should be able to go from FFV1/MKV to MOV with no issues. But of course, we didn’t want to simply trust the manual, we wanted to test every step of the process and be confident that the videos we transferred from the analog to the digital realm would survive another migration, an entirely digital one this time, completely intact.
Batch Migration from FFV1/MKV to v210/MOV
The first thing we did was use FFmpeg to transcode from FFV1/MKV to v210/MOV. This was done for an entire batch of files using a single-line bash script:
for file in *.mkv ; do ffmpeg -i “$file” -movflags write_colr -c:v v210 -color_primaries smpte170m -color_trc bt709 -colorspace smpte170m -color_range mpeg -metadata:s:v:0 “encoder=Uncompressed 10-bit 4:2:2” -c:a copy -vf setfield=bff,setsar=40/27,setdar=4/3 -f mov “${file%.*}.mov” ; done
This command was inspired by the command that vrecord uses to create v210 files. There’s a lot going on, so let’s walk through it step by step:
for file in *.mkv ; do ffmpeg -i “$file” -movflags write_colr -c:v v210 -color_primaries smpte170m -color_trc bt709 -colorspace smpte170m -color_range mpeg -metadata:s:v:0 “encoder=Uncompressed 10-bit 4:2:2” -c:a copy -vf setfield=bff,setsar=40/27,setdar=4/3 -f mov “${file%.*}.mov” ; done
These highlighted segments contain commands which parse out all of the .mkv files in a directory. It then uses $file as a variable for each .mkv file’s path and insert it into FFmpeg’s input. At the end of the script, the .mkv file path is inserted again, but this time substituting the .mkv extension for .mov. The done portion is necessary for bash to read and run the script properly.
for file in *.mkv ; do ffmpeg -i “$file” -movflags write_colr -c:v v210 -color_primaries smpte170m -color_trc bt709 -colorspace smpte170m -color_range mpeg -metadata:s:v:0 “encoder=Uncompressed 10-bit 4:2:2” -c:a copy -vf setfield=bff,setsar=40/27,setdar=4/3 -f mov “${file%.*}.mov” ; done
This highlighted segment contains the options that tell FFmpeg to process the FFV1/MKV file and turn it into a properly formatted v210/MOV file. Let’s walk through each set of arguments:
-movflags write_colr
This tells FFmpeg to write the COLR atom, which is necessary for a properly formatted MOV file.
-c:v v210
The flag -c:v tells is where we specify the Video Codec. In this line we tell FFmpeg to transcode the FFV1 video stream to v210, which is the technical codec name for Uncompressed 10-bit 4:2:2.
-color_primaries smpte170m -color_trc bt709 -colorspace smpte170m -color_range mpeg
These arguments define the parameters of the file’s colorspace. This is important so that the decoder knows how to display the color data in the file.
-metadata:s:v:0 “encoder=Uncompressed 10-bit 4:2:2”
This sets the “encoder” field of the first video stream to “Uncompressed 10-bit 4:2:2″. This helps the file to be self-describing. The :s says to looks for a stream (:c could be used for a chapter, or :p for a program), :v defines that it’ll be a video stream, and :0 says it’ll be the first video stream (in code counting typically begins at 0).
-c:a copy
This tells FFmpeg to not transcode the audio track, but to simply copy it into the new file. We want to perform a stream copy for the audio because we only want to change the video codec, and re-transcoding the audio could possibly cause irreparable data loss.
-vf setfield=bff,setsar=40/27,setdar=4/3
This segment is a series of video filters, which come after the -vf flag. Here we are setting the field order to Bottom Field First (BFF), the Storage Aspect Ratio (SAR) to 40/27, and the Display Aspect Ratio (DAR) to 4/3.
-f mov
This tells FFmpeg that the file we’re creating will be MOV format. FFmpeg can usually guess the container format based off of the output file extension, but it doesn’t hurt to declare it in the transcode string.
And with that, we created v210/MOV files from the FFV1/MKV files! That could be it, but we were not ready to stop there. We wanted to make sure that these MOV files contain exactly the same data as the original MKV files.
Testing for Format Integrity and Content Integrity
Now that we’ve got a bunch of shiny new MOV files, we want to make sure that they’re correct! In this case, correct means that the files are properly formatted (which we’ll refer to as Format Integrity) and that the video and audio essence from the FFV1/MKV files were properly migrated without losing any data, which we’ll refer to as Content Integrity.
The best tool that we have to confirm Format Integrity is MediaConch. This is a tool that allows the user to test files against policies. Policies can be created by individuals or the community at large. For this test, we started by using the CAVPP Preservation Master profile. Here’s what we got when we ran our files through this policy:
It passed! However, the tests for this policy are not incredibly thorough. In order to make sure that other features of the file format are correct we created a new MediaConch policy using a file that was created by vrecord. Since we regularly deliver files created with vrecord, we felt that as long as the MOV files created in this transcoding process have the same format specifications as files created by vrecord, we could consider the transcoded files to be as correct as the files we regularly deliver. We understand that this presents somewhat of a tautology, since it depends on the vrecord files being correct. However, the vrecord tool is used widely by a/v preservation labs, is held in high regard by the preservation community, and has been developed with input from community members. Because of this, we decided it was ok to use vrecord files as a benchmark. Here’s what we saw:
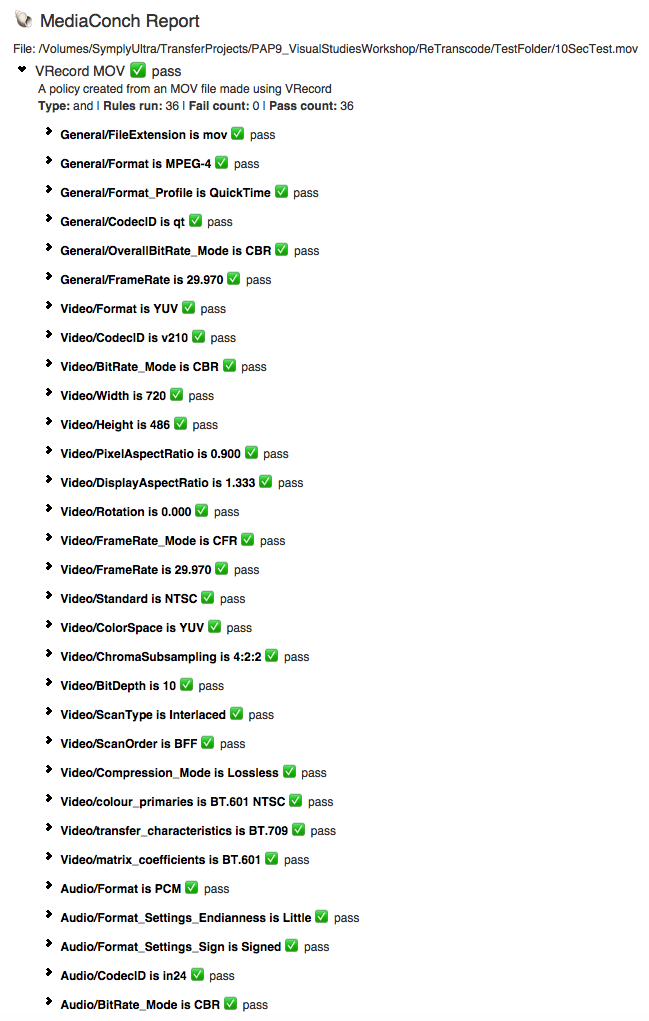
It passed again! From this, we confirmed that we had Format Integrity!
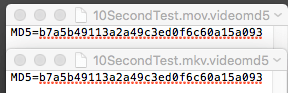
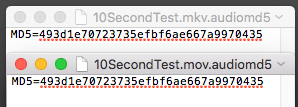
Now it was time to move onto Content Integrity. To do this we used FFmpeg again. FFmpeg allows the user to create an md5 of an entire essence stream. For our purposes, we wanted to create an MD5 checksum of the video stream and audio stream separately of each file. To do this we used the following two single-line scripts:
for file in *.m*v ; do ffmpeg -i “$file” -an -f md5 “${file%}.videomd5” ; done
for file in *.m*v ; do ffmpeg -i “$file” -vn -f md5 “${file%}.audiomd5” ; done
The first script finds all of the MKV and MOV files in a folder and creates an MD5 of only the video stream (-an tells FFmpeg to ignore the audio stream) and then places it in a sidecar file with the extension .videomd5.
Likewise, the second script finds all of the MKV and MOV files in a folder and creates an MD5 of only the audio stream (-vn tells ffmpeg to ignore the audio stream) and then places it in a sidecar file with the extension .audiomd5.
From here it’s just a matter of comparing the MD5 of the MKV and MOV streams. At this point there was no bash scripting or application to help, we simply opened up the MD5 sidecar files in TextEdit and made the comparison manually. One feature of MD5 checksums is that even minor changes to the input file will create drastic changes in the resulting checksum. This is makes a quick visual comparison fairly easy to do.
If anybody has any good suggestions on how to use diff or a similar tool to do this comparison quickly, please let us know! Automation would certainly be useful on a batch of hundreds of files, but for 27 files we were fine to do it manually.
UPDATE 12/19/2019: Katherine Frances (@knfrances) wrote a python script to automate the validation of the checksum files.
The script is available on Katherine’s github repo. Thank you Katherine!!!
Thanks for stopping by!


